How to | WFT-E4 II - Windows 7 - 16|06|12
_______
How to set up the Canon WFT-E4 II in FTP mode with Windows 7 on an Ad-hoc network
Advanced warning - This post is only for people looking to set up their Canon WFT-E4 II with Windows 7 in ftp mode with an ad-hoc network, if you're not trying to set up this wireless file transmitter do not read on, it's very boring.
I've just lost a good couple of days attempting to get the 5d mkII's wireless file transmitter to work properly with windows 7 in ftp mode with an ad-hoc network. Seeing as Canon's manual is next to useless and the set up requires some pretty full on networking knowledge I thought I would turn my lost hours into something positive by helping others stuck in the WFT-E4 II ftp quagmire.
There are some good guides online to help Mac users such as Mr Lovegroves here which are simple and have worked well for me in the past but for some reason Windows 7 is a little trickier to set up. I would like to point out at this point that I am a photographer, not an IT or networking specialist, the route I've taken to get this pesky WFT functioning in FTP mode may not be the best but it works. This guide is written in layman's terms as I myself am very much a layman. I have also borrowed heavily from the Canon Digital Learning Centers online guide, which although useful is not entirely correct in it's ordering. Please ignore some of the numbering in the guide images, some parts are lifted from the Canon guide others I've written myself.
FTP Mode allows you to wirelessly transfer images from your EOS DSLR to a WiFi-enabled computer that you have set up as a remote FTP server. The EOS Wireless File Transmitter will function as the FTP client. This basic guide will describe how to create an ad hoc network FTP server on a PC running the Premium or Professional versions of Microsoft Windows 7. If you do not have either version installed on your PC you will either need to upgrade or, if you prefer, you can use one of the available third-party FTP server software applications.
It is important that you follow the guide in the order it is written. If anything doesn't make sense please message me in the comments. Also make sure you have installed the WFT software and drivers before starting.
(1)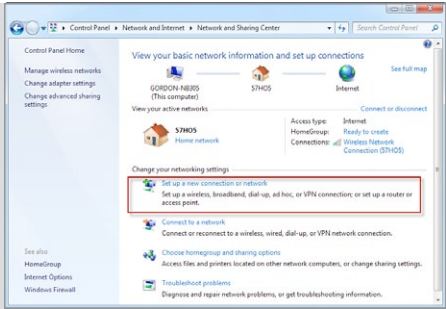 Click Start, then Control
Panel, then Network and
Internet, then Network
and Sharing Center.
Below Change your networking settings, select
Set up a new connection
or network.
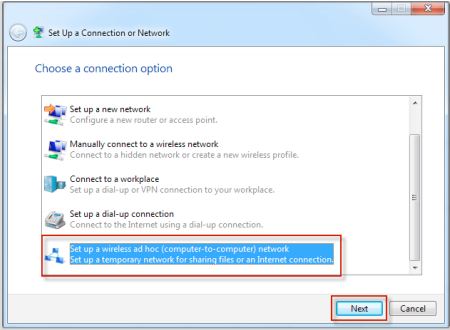 (2)
On the Choose a connection option window,
select, Set up a wireless
ad hoc (computer-to computer) network, then
click the Next button
(3)
The computer will create the ad-hoc network, click next. Enter a short 5 letter Network Name all lowercase (for ease later). Select security type WEP and again enter a 5 letter all lower case security key, I would recommend 'abcde'. Make sure you tick 'save this network'. Once the ad-hoc network has been created instruct the computer to connect to it.
(4)
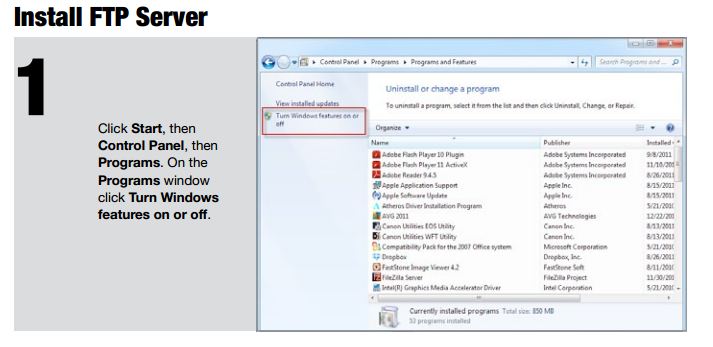
(5)
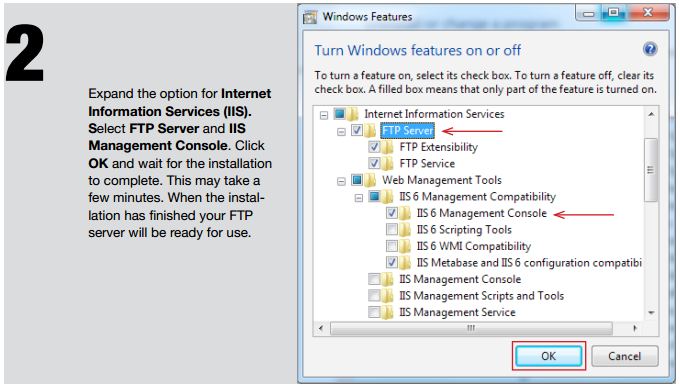 It's not ticked in the above diagram taken from Canon's online (not so helpful) guide but make sure you also tick IIS Management Console.
(6)
Important!
Turn off your computers firewall! It's an annoying compromise, but I've never managed to get the WFT-E4 II working in ftp mode with the firewall on.
(7)
This next stage is the way I get the computer to generate a usable Ip Address. It involves connecting the camera to the computer in EosUtility mode just for this purpose.
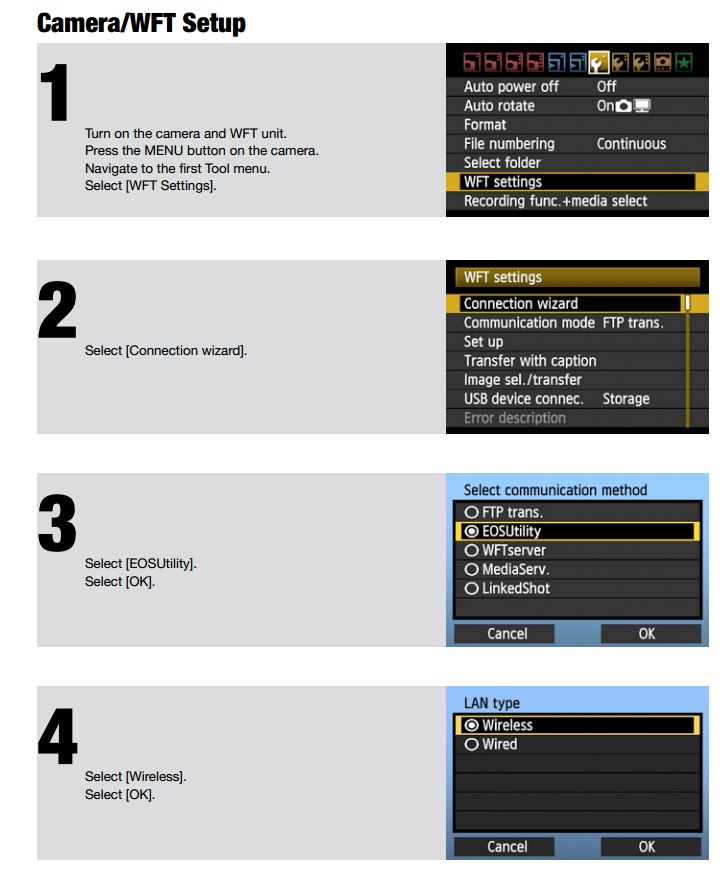
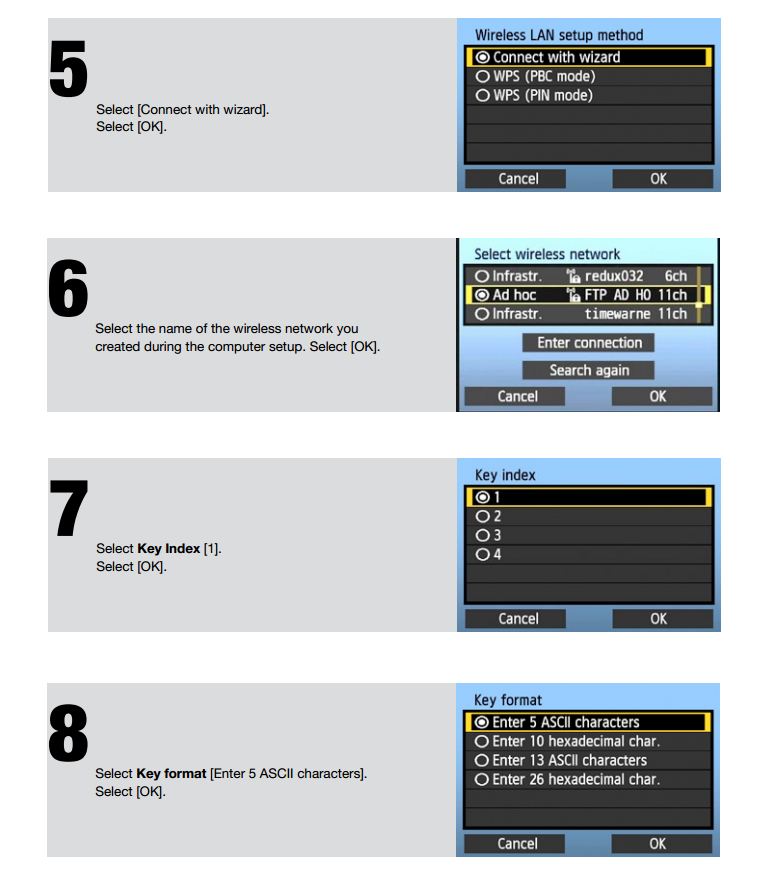
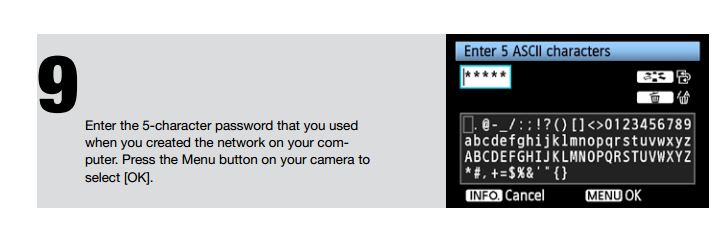
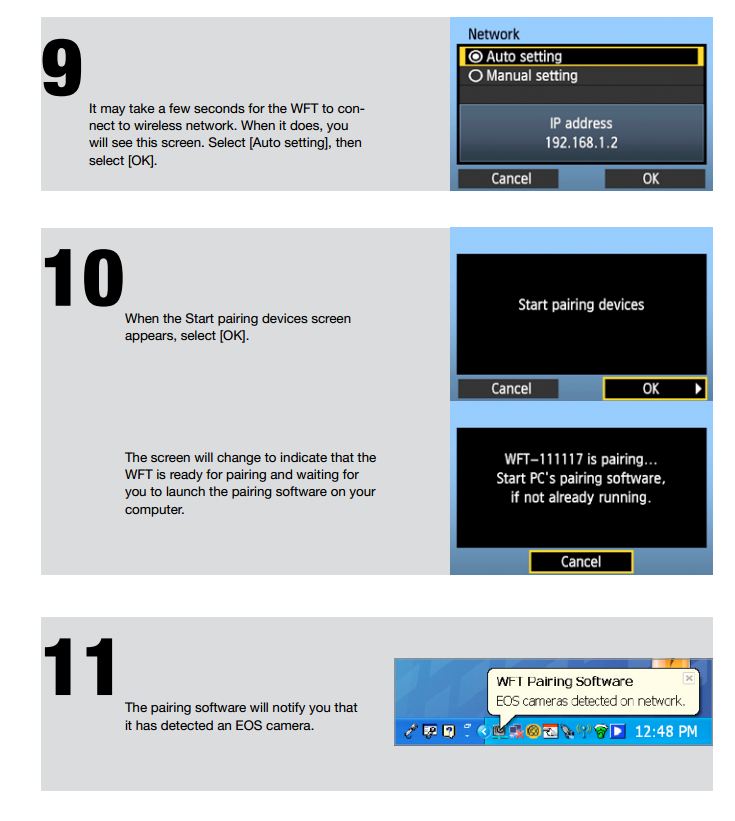
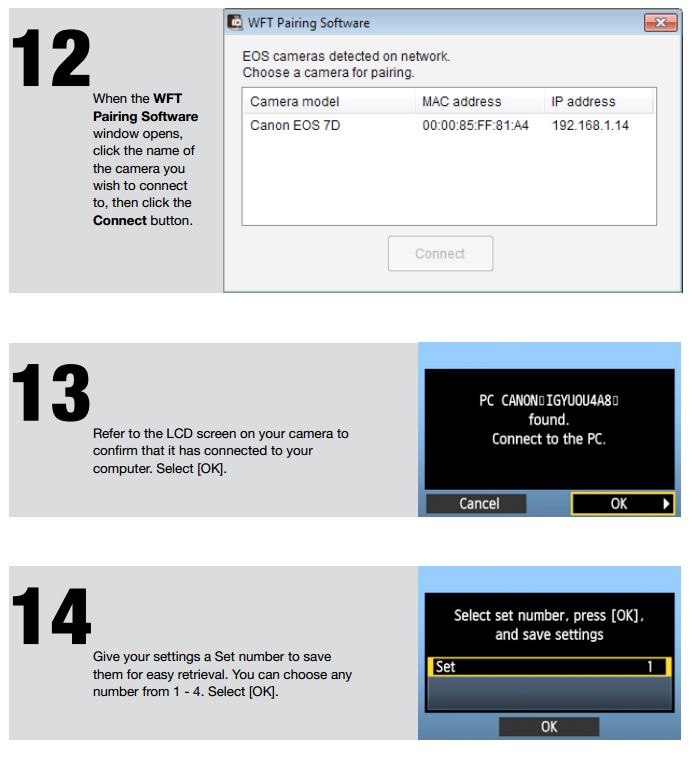
If you have installed the Eos Utility it should automatically start-up at this point. Important! Make sure you click 'exit' from the Eos Utility software on the computer before progressing to the next stage.
(8)
Click the start button type 'cmd' into the search bar. Double click the Cmd program to load up a command prompt window and type 'ipconfig' and hit enter.
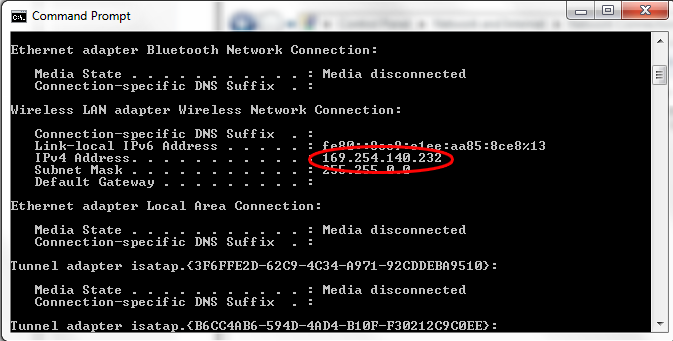 You're looking for the IPv4 Address that has now been generated in the current connection mode. If all is well at this point I believe the WFT E4II should generate an Ip address starting with 169.254. Write down this Ip Address you'll need it for the next step.
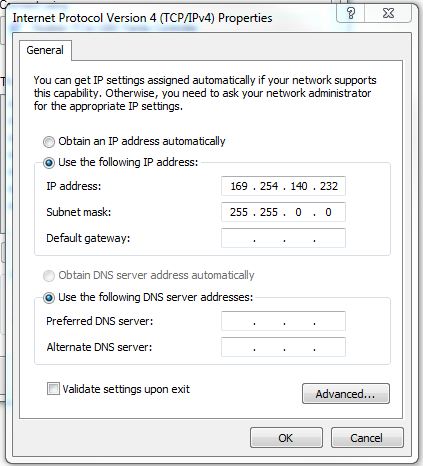
I've taken to always manually setting the adhoc networks Ip address to whatever the ipconfig prompt throws up. I'm not entirely sure it helps but I read somewhere it keeps the connection stable. To do this go to open network and sharing then click change adapter settings, then right click on the Wireless adhoc connection and select properties. Select Internet Protocol Version 4 (TCP/IPv4) and click properties. Select Use the following IP Address and enter the IP address from above so in my case its 169.254.140.232 (as seen below), the Subnet mask should auto complete, click OK.
(9)
Crucially It is at this stage you create the local ftp server not at the beginning of the process as the Canon guides would have you do.
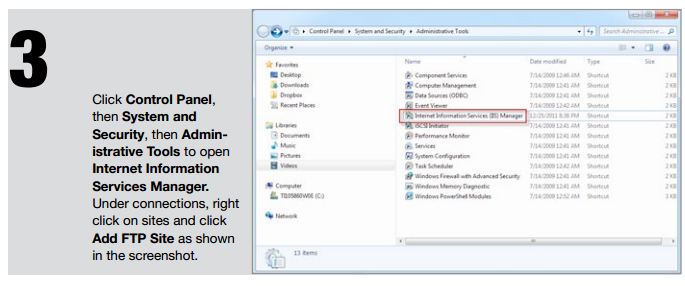
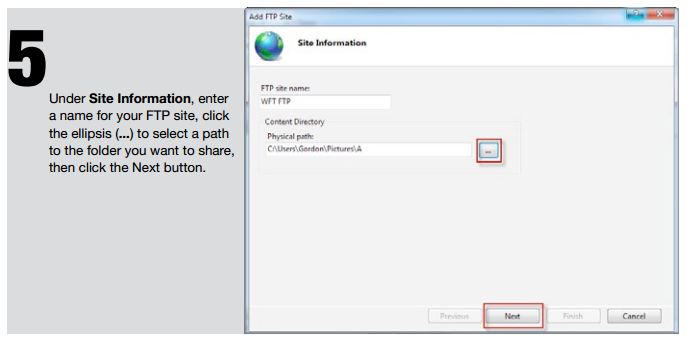 The path that you select at this point is the folder that the pictures from the Wft will drop into. Again with the FTP site name keep it simple and all lower case, it makes things easier later.
In the next box you will see the drop down menu for the 'binding' setting. (ignore the IP address in the image below) The default IP address should be the same as the one you found when running the ipconfig command earlier. If they are the same pat yourselves on the back everything is working so far.
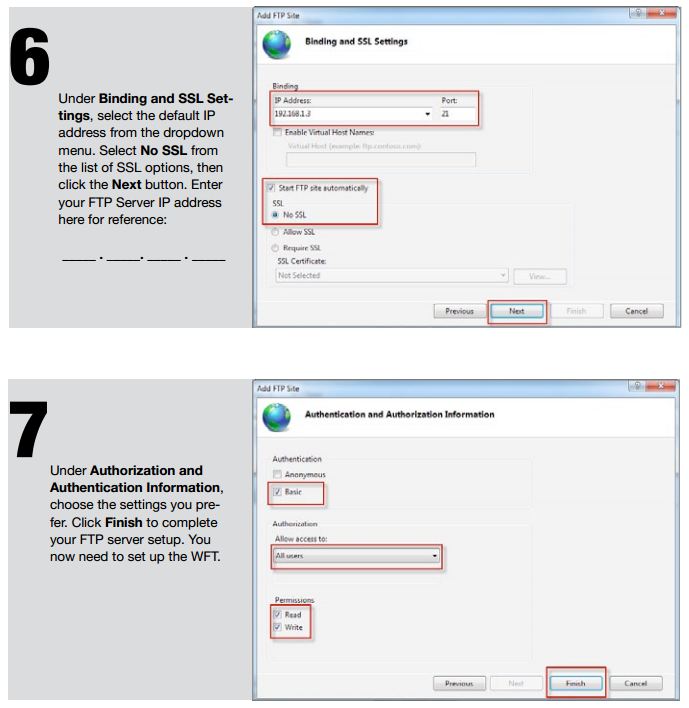 Copy diagram 7's above settings exactly otherwise you will run into problems later.
(10)
You are now on the home straight. If everything above has been done correctly you now just have to configure the Wft E4II on the back of the camera. Follow the steps below.
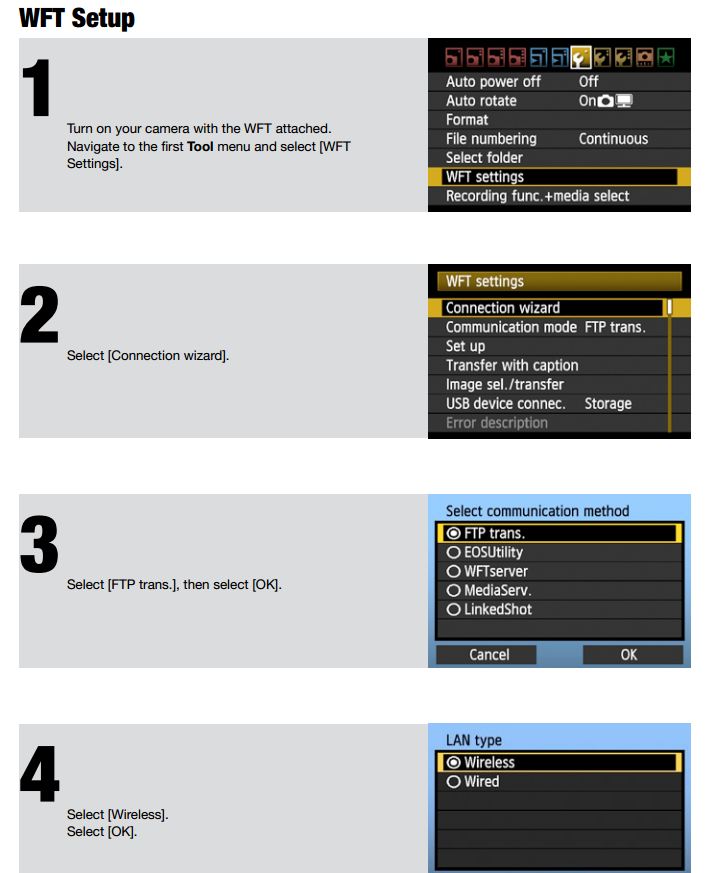
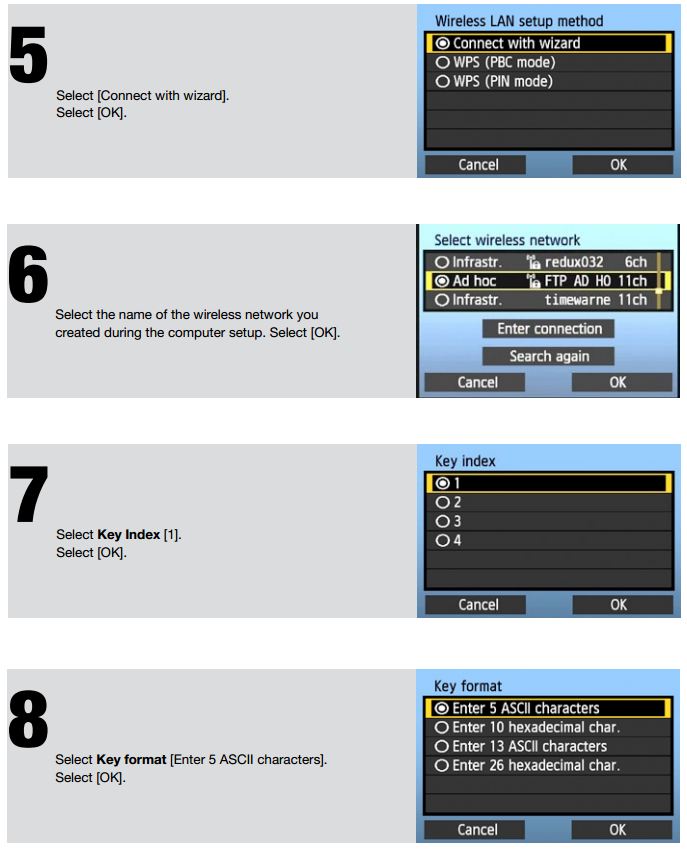
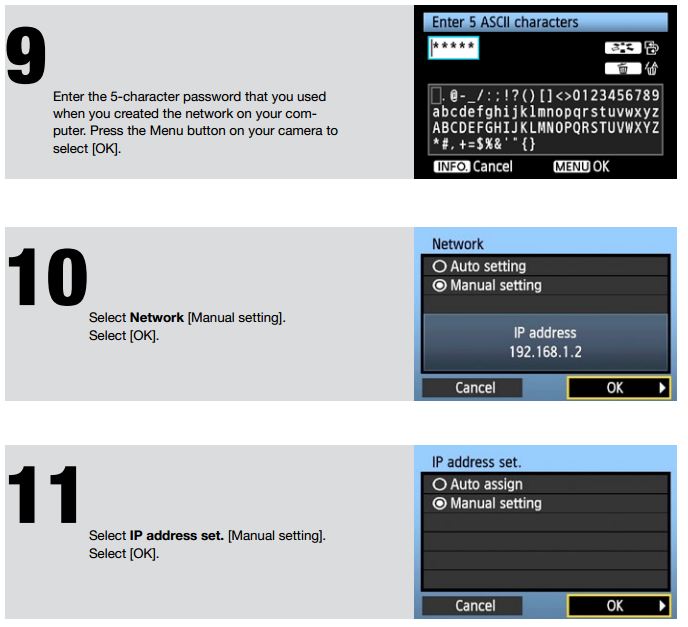 In the next menu you enter the ip address for the WFT unit. Enter the ip address you picked up in the ipconfig prompt but change the last digits by 1. So if the the Ip config prompt gave you the address 169.254.140.232 give the wft unit the ip address 169.254.140.233. You get the idea.
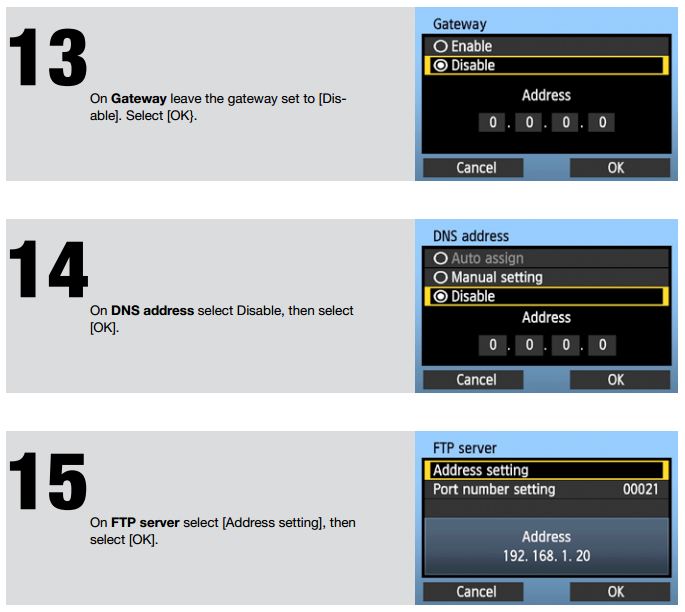 (STEP 16) Enter the same ip address you picked up in the ipconfig and wrote down earlier, in my case it's 169.254.140.232
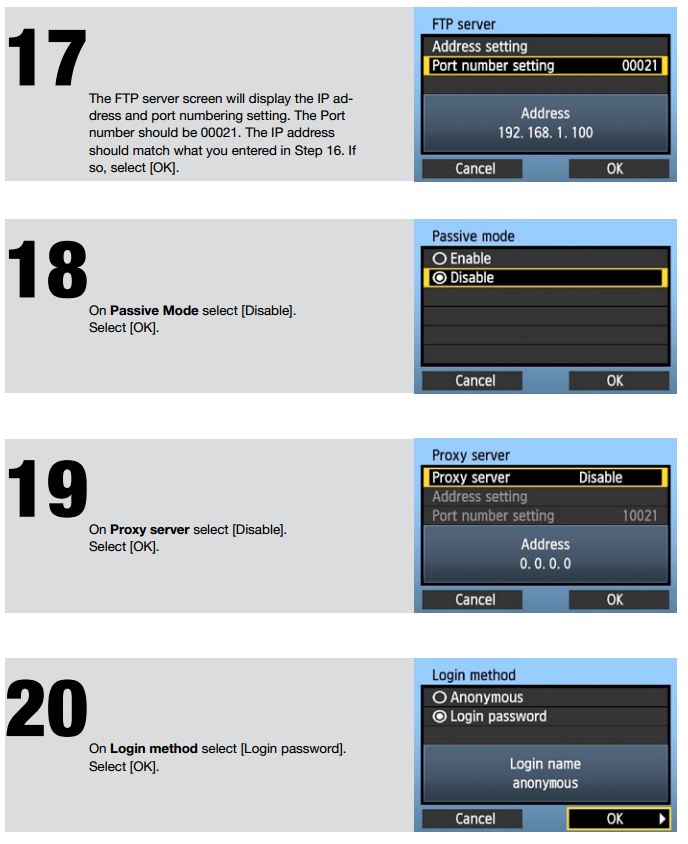 (STEP 21,22,23) You will now have to fill in your username and password for the ftp server you set up earlier. The default password for a local server is your windows username and password. Enter them carefully and be sure to use spaces and any Capital letters that are in the username or password.If you don't have a windows user account name and password unfortunately you're going to have to create one.
On the Target Folder menu select Root Folder and press OK. Voila! All being well you should now be looking at the screen below. Save your settings in one of the five predesignated save slots.
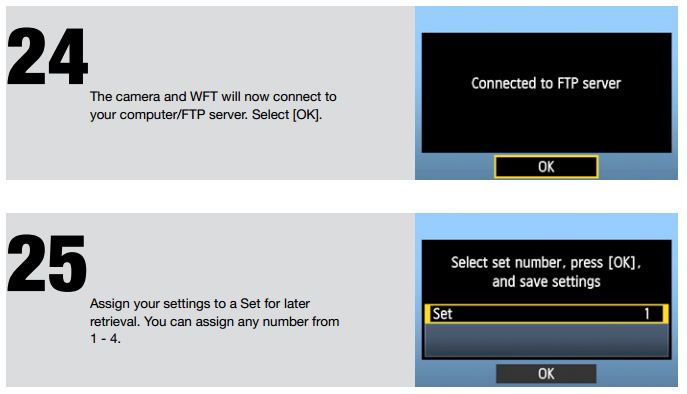
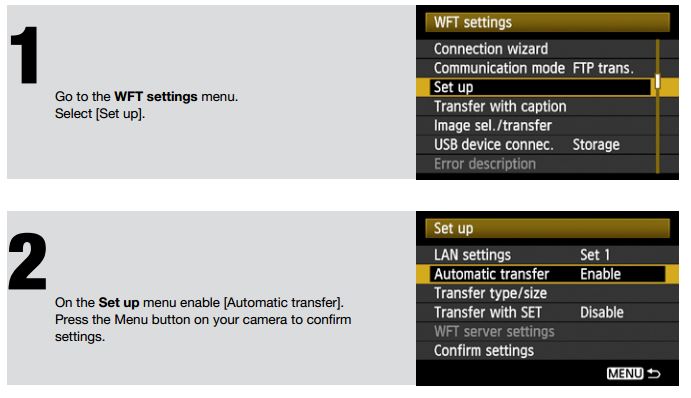
The last thing if you haven't already done it is to set the transfer mode to automatic.
So, there it is. My comprehensive guide for people like myself who have no idea what their doing when it comes to networks.
Sometimes the connection is lost if for instance I switch the Wi-fi adapter back on in the laptop. To get the camera and laptop to connect again I just run through the Eos Utility setup as we did before, once that'c connected shut the Eos Utility down and load the FTP settings that were save in one of the predesignated slots in the camera. That usually works.
If you've discovered something I've missed please let me know in the comments.
Happy Wireless File Transmitting...

